화면전환 orientation

Android 2016. 3. 16. 14:57
public void setOrientation(Orientation orientation) {
if (orientation.equals(Orientation.PORTRAIT)) {
setRequestedOrientation(ActivityInfo.SCREEN_ORIENTATION_PORTRAIT);
} else if (orientation.equals(Orientation.LANDSCAPE)) {
setRequestedOrientation(ActivityInfo.SCREEN_ORIENTATION_LANDSCAPE);
} else if (orientation.equals(Orientation.AUTO)) {
setRequestedOrientation(ActivityInfo.SCREEN_ORIENTATION_SENSOR);
}
}

enum Orientation {
PORTRAIT,
LANDSCAPE,
AUTO
}


private boolean isPortraitMode() {
final int rotation = ((WindowManager) getSystemService(Context.WINDOW_SERVICE)).getDefaultDisplay().getOrientation();
switch (rotation) {
case Surface.ROTATION_0:
case Surface.ROTATION_180:
return true;
default:
return false;
}
}


블로그 이미지

코딩저장소

,


private void addFavoriteDrawer() {
FragmentManager fragmentManager = getSupportFragmentManager();
FragmentTransaction fragmentTransaction = fragmentManager
.beginTransaction();
fragmentTransaction.replace(R.id.navigation_frame,
VRecommandFragment_.builder().build());
fragmentTransaction.commit();

DisplayMetrics metrics = new DisplayMetrics();
getWindowManager().getDefaultDisplay().getMetrics(metrics);
DrawerLayout.LayoutParams params = (DrawerLayout.LayoutParams) navigation_frame.getLayoutParams();
params.width = metrics.widthPixels;
navigation_frame.setLayoutParams(params);
}

<FrameLayout
android:id="@+id/navigation_frame"
android:layout_width="match_parent"
android:layout_height="match_parent"
android:layout_gravity="end"
android:fitsSystemWindows="true" />


블로그 이미지

코딩저장소

,

'Android > Libraries' 카테고리의 다른 글

ViewAnimator  (0) 2016.02.02
viewpager ProductTour  (0) 2016.02.02
GlidePalette  (0) 2016.01.15
블로그 이미지

코딩저장소

,

intent email

Android 2016. 2. 17. 16:16
Activity act = (Activity) context;
Intent shareIntent = ShareCompat.IntentBuilder.from(act)
.setType("text/plain")
.addEmailTo("cs@qualson.com")
.setSubject("[텔레포트] 서비스 문의")
.setText("문의사항 >>\n\n")
//.setHtmlText(body); //If you are using HTML in your body text
.setChooserTitle("Send Email")
.getIntent()
.setPackage("com.google.android.gm");

act.startActivity(shareIntent);


블로그 이미지

코딩저장소

,

http://fxrlabs.com/uncategorized/android-xml-drawable-top-bottom-border/


I have seen the question asked many times on how to create an XML drawable in Android that has only a top and bottom border or perhaps one side of the border missing.

Searching the web you will find many people answer that this cannot be done when in fact the solution is really quite simple

So what we want to do is convert this:

Into something like this using an XML drawable:

The simple answer is to use the inset tag as follows:

We are basically shifting the image to a negative offset in both directions. You might ask if this will still show the left and right borders if your containing view doesn’t take up the full screen. The answer is no, the drawing is limited to the bounds of the view itself thus we have shifted part of the drawing outside of the bounds thus solving our problem.


'Android' 카테고리의 다른 글

화면전환 orientation  (0) 2016.03.16
Framelayout에 fragment 넣기  (0) 2016.02.19
intent email  (0) 2016.02.17
안드로이드 마시멜로우 퍼미션 처리  (0) 2016.02.16
안드로이드 intent email 공유기능  (0) 2016.01.27
블로그 이미지

코딩저장소

,
@Override
public void onRequestPermissionsResult(int requestCode, String[] permissions, int[] grantResults) {
switch (requestCode) {
case REQUEST_CODE_ASK_PERMISSIONS:
if (grantResults[0] == PackageManager.PERMISSION_GRANTED) {
// Permission Granted
presenter.setView(this).setDeviceId(app.getDeviceId()).initialize();
} else {
// Permission Denied
ToastUtil.show(this, "GET_ACCOUNTS Denied");
}
break;
default:
super.onRequestPermissionsResult(requestCode, permissions, grantResults);
}
}


protected void init() {
if (android.os.Build.VERSION.SDK_INT >= Build.VERSION_CODES.M) {

int hasWriteContactsPermission = checkSelfPermission(Manifest.permission.READ_PHONE_STATE);
if (hasWriteContactsPermission != PackageManager.PERMISSION_GRANTED) {
requestPermissions(new String[]{Manifest.permission.READ_PHONE_STATE},
REQUEST_CODE_ASK_PERMISSIONS);
return;
} else {
presenter.setView(this).setDeviceId(app.getDeviceId()).initialize();
}
} else {
presenter.setView(this).setDeviceId(app.getDeviceId()).initialize();
}
}


블로그 이미지

코딩저장소

,

ViewAnimator

Android/Libraries 2016. 2. 2. 17:35

https://github.com/florent37/ViewAnimator


A fluent Android animation library !

png

Usage

Animate multiple view from one method

ViewAnimator
       .animate(image)
           .translationY(-1000, 0)
           .alpha(0,1)
       .andAnimate(text)
           .dp().translationX(-20, 0)
       .descelerate()
       .duration(2000)

       .thenAnimate(image)
            .scale(1f,0.5f,1f)
       .accelerate()
       .duration(1000)

       .start();

gif

Without ViewAnimator

AnimatorSet animatorSet = new AnimatorSet();
animatorSet.playTogether(
  ObjectAnimator.ofFloat(image,"translationY",-1000,0),
  ObjectAnimator.ofFloat(image,"alpha",0,1),
  ObjectAnimator.ofFloat(text,"translationX",-200,0)
);
animatorSet.setInterpolator(new DescelerateInterpolator());
animatorSet.setDuration(2000);
animatorSet.addListener(new AnimatorListenerAdapter(){
    @Override public void onAnimationEnd(Animator animation) {

      AnimatorSet animatorSet2 = new AnimatorSet();
      animatorSet2.playTogether(
          ObjectAnimator.ofFloat(image,"scaleX",1f,0.5f,1f),
          ObjectAnimator.ofFloat(image,"scaleY",1f,0.5f,1f)
      );
      animatorSet2.setInterpolator(new AccelerateInterpolator());
      animatorSet2.setDuration(1000);
      animatorSet2.start();

    }
});
animatorSet.start();

More

gif

'Android > Libraries' 카테고리의 다른 글

라이브러리 사이트  (0) 2016.02.18
viewpager ProductTour  (0) 2016.02.02
GlidePalette  (0) 2016.01.15
블로그 이미지

코딩저장소

,

https://github.com/matrixxun/ProductTour


뷰페이져 라이브러리...일단 킵..


ProductTour

ProductTour is android sample project implementing a parallax effect welcome page using PageTransformer, similar to the one found in google's app like Sheet, Drive...

ProductTour Screen Capture

'Android > Libraries' 카테고리의 다른 글

라이브러리 사이트  (0) 2016.02.18
ViewAnimator  (0) 2016.02.02
GlidePalette  (0) 2016.01.15
블로그 이미지

코딩저장소

,

ShareCompat.IntentBuilder.from((Activity) context)
.setType("text/plain")
.addEmailTo("cs@xxxxx.com")
.setSubject("서비스 문의")
.setText("문의사항 >>\n\n")
//.setHtmlText(body); //If you are using HTML in your body text
.setChooserTitle("Send Email")
.startChooser();


이렇게 하면!

네이버 앱에서도 인텐트를 받는다..


기존방식으로 하면 네이버는 못받는다...


이제부턴 쉐어컴뱃을 사용하도록

블로그 이미지

코딩저장소

,

GlidePalette

Android/Libraries 2016. 1. 15. 16:48

https://github.com/florent37/GlidePalette


GlidePalette

Alt sample

Download

In your module Download

compile 'com.github.florent37:glidepalette:1.0.5@aar'
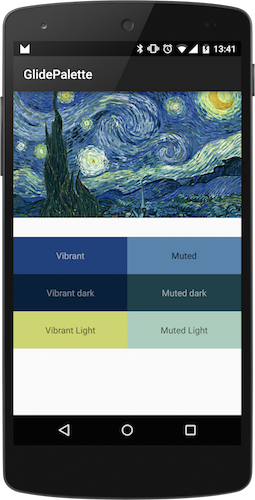
Sample

Glide.with(this).load(url)
         .listener(GlidePalette.with(url)
               .use(GlidePalette.Profile.MUTED_DARK)
                   .intoBackground(textView)
                   .intoTextColor(textView)

               .use(GlidePalette.Profile.VIBRANT)
                    .intoBackground(titleView, GlidePalette.Swatch.RGB)
                    .intoTextColor(titleView, GlidePalette.Swatch.BODY_TEXT_COLOR)
                    .crossfade(true)
         );
         .into(imageView);

Initialisation

First, init GlidePalette with an Url

GlidePalette.with(url)

Palettes

You can successively use following Palettes :

  • Palette.VIBRANT
  • Palette.VIBRANT_DARK
  • Palette.VIBRANT_LIGHT
  • Palette.MUTED
  • Palette.MUTED_DARK
  • Palette.MUTED_LIGHT
.use(GlidePalette.Profile.MUTED_DARK)

Each time you call "use" the next modification will follow this Profile

.use(GlidePalette.Profile.MUTED_DARK)
    //next operations will use Profile.MUTED_DARK
.use(GlidePalette.Profile.VIBRANT)
    //next operations will use Profile.VIBRANT

Swatches

With the following Swatches

  • RGB
  • TITLE_TEXT_COLOR
  • BODY_TEXT_COLOR

Targets

Into Backgrounds

.intoBackground(view)
.intoBackground(view,Swatch.RGB)

And TextView Color

.intoTextColor(textView)
.intoTextColor(textView,Swatch.TITLE_TEXT_COLOR)

with optional Background Crossfade effect

.crossfade(true)
    // will use default 300ms crossfade
.crossfade(true, 1000)
    // specify own crossfade speed in ms

CallBack

Or simply return into CallBack

.intoCallBack(
    new GlidePalette.CallBack() {
          @Override
          public void onPaletteLoaded(Palette palette) {
              //specific task
          }
    })

TODO

Community

Looking for contributors, feel free to fork !

Dependencies

Credits

Author: Florent Champigny www.florentchampigny.com/

Follow me on Google+ Follow me on Twitter Follow me on LinkedIn

License

Copyright 2015 florent37, Inc.

Licensed under the Apache License, Version 2.0 (the "License");
you may not use this file except in compliance with the License.
You may obtain a copy of the License at

   http://www.apache.org/licenses/LICENSE-2.0

Unless required by applicable law or agreed to in writing, software
distributed under the License is distributed on an "AS IS" BASIS,
WITHOUT WARRANTIES OR CONDITIONS OF ANY KIND, either express or implied.
See the License for the specific language governing permissions and
limitations under the License.


'Android > Libraries' 카테고리의 다른 글

라이브러리 사이트  (0) 2016.02.18
ViewAnimator  (0) 2016.02.02
viewpager ProductTour  (0) 2016.02.02
블로그 이미지

코딩저장소

,